Roof flashing is a thin layer of metal or waterproof material placed at vulnerable points on your roof to redirect water away from joints, edges, and openings. Without proper roof flashing, water seeps into your roof structure and causes rot, mould, and costly interior damage over time.
Every roof has areas where two surfaces meet, such as around chimneys, skylights, vents, and valleys. These intersection points are where leaks most commonly begin, and roof flashing acts as the first line of defence.
Choosing the right material, installing it correctly, and knowing when to replace worn sections can save you thousands of dollars in future repairs. This post covers the different types of roof flashing, how the installation process works, the warning signs that your flashing needs attention, and practical maintenance tips for Canadian homeowners.
If you need professional help, the team at Zega Roofing in Winnipeg is always ready to assist with inspections, repairs, and full roofing installations.
How Is Roof Flashing Installed?
Roof flashing installation is a step-by-step process that requires precision, the right materials, and a solid understanding of how water moves across a roof surface. Professional roofers follow a specific sequence to make sure every vulnerable area stays sealed against moisture.
The process starts with an inspection. A qualified roofer examines all the areas where the roof meets a wall, chimney, skylight, vent pipe, or valley. Each of these spots needs a custom-fitted piece of roof flashing cut to the exact measurements of the joint.
Once the measurements are taken, the roofer selects the appropriate flashing material, typically aluminum, galvanized steel, or copper, depending on the roof type and climate conditions. In Winnipeg, where freeze-thaw cycles are frequent, durable metals that resist expansion and contraction are preferred.
The old shingles or roofing material around the joint area are carefully lifted or removed. The roofer then places the roof flashing piece against the joint, layering it so water flows over the flashing and onto the shingles below rather than underneath them. This overlapping technique is critical because it uses gravity to move water away from the seam.
Roofing cement or sealant is applied along the edges of the flashing to create a watertight bond. In some cases, mechanical fasteners like nails or screws are also used to secure the flashing in place. The shingles are then replaced over the top edge of the flashing, hiding the metal while still allowing water to run off properly.
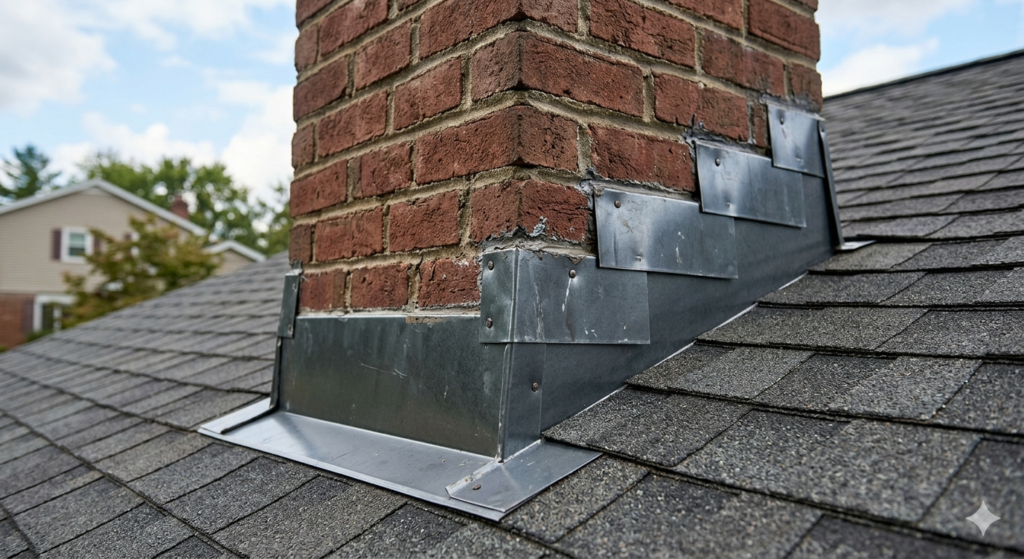
For chimney installations, roofers use a combination of step flashing and counter flashing. Step flashing consists of small L-shaped pieces layered with each row of shingles as they climb up the side of the chimney.
Counter flashing is then embedded into the mortar joints of the chimney itself, folding down over the step flashing to create a double barrier against water entry.
If you are looking for reliable roof flashing installation in Winnipeg, contact Zega Roofing for a free inspection and estimate.
Types of Roof Flashing Every Homeowner Should Know
Not all roof flashing is the same. Different areas of your roof call for different shapes, sizes, and styles. Knowing which type goes where helps you communicate better with your roofer and understand the work being done on your home.
Step Flashing
Step flashing is used where the roof meets a vertical wall or chimney. It consists of rectangular metal pieces bent into an L-shape and woven between each course of shingles. This creates a stair-step pattern that channels water down the roof surface.
Valley Flashing
Valley flashing protects the V-shaped channels where two roof slopes meet. Since valleys funnel a large volume of water, this type of roof flashing must be particularly wide and durable to handle heavy rain and snowmelt.
Drip Edge Flashing
Drip edge flashing runs along the edges of the roof at the eaves and rake. It prevents water from curling back under the shingles and protects the fascia boards and decking from moisture damage.
Vent Pipe Flashing
Also called a pipe boot, vent pipe flashing fits around plumbing vents and exhaust pipes that penetrate the roof. It typically features a rubber or neoprene collar that seals tightly around the pipe.
Continuous Flashing
Sometimes referred to as apron flashing, continuous flashing is a single long piece of metal that directs water along a joint between the roof and a vertical wall. It works well for shorter wall-to-roof transitions.
Kickout Flashing
Kickout flashing is a small but essential piece installed at the bottom edge where a roof meets a sidewall. It directs water away from the wall and into the gutter, preventing moisture from running down the exterior wall surface.
Materials Used for Roof Flashing
The material you choose for roof flashing affects its lifespan, cost, and performance. Here is a comparison of the most commonly used materials in Canadian roofing.
| Material | Durability | Best For | Lifespan |
| Aluminum | Lightweight, corrosion-resistant | Most residential roofs | 20 to 30 years |
| Galvanized Steel | Strong, affordable | Steep-slope roofs, high-wind areas | 20 to 25 years |
| Copper | Premium, naturally patinas | Heritage or high-end homes | 50+ years |
| Lead | Malleable, heavy-duty | Complex chimney details | 100+ years (less common today) |
| Rubber/Neoprene | Flexible, easy to install | Vent pipe boots | 10 to 15 years |
Your roofer will recommend the right material based on your roof type, budget, and local weather conditions. Zega Roofing uses high-quality materials suited for Winnipeg’s extreme temperature swings, and the team can help you choose the best option for your property. You can also explore the areas we served to see if your neighbourhood falls within the service range.
Warning Signs Your Roof Flashing Needs Repair

Roof flashing does not last forever. Over time, exposure to sun, rain, snow, and ice causes it to deteriorate. Catching problems early prevents small issues from becoming expensive repair projects.
Here are the most common warning signs to watch for:
Visible rust or corrosion on the metal surface is one of the earliest indicators of roof flashing failure. Once rust takes hold, the metal weakens and allows moisture to pass through.
Cracked or dried-out sealant around the edges of the flashing means the watertight seal has broken. Water can now penetrate behind the flashing and reach the roof deck.
Water stains on your ceiling or interior walls, especially near chimneys, skylights, or where walls meet the roofline, often point directly to failing roof flashing.
Loose or lifted flashing pieces that are no longer sitting flat against the roof surface can be caused by wind damage, thermal expansion, or improper installation.
Missing sections of flashing, particularly after severe storms, leave your roof completely exposed at its most vulnerable points.
If you notice any of these signs, it is best to schedule a professional inspection right away. Zega Roofing offers free roof inspections across Winnipeg and can identify roof flashing issues before they turn into larger problems. Check out our gallery to see examples of our completed roofing projects.
Roof Flashing Maintenance Tips for Canadian Homeowners
Proper maintenance extends the life of your roof flashing and helps prevent unexpected leaks during heavy rains or spring snowmelt. Here are practical tips you can follow throughout the year.
| Season | Maintenance Task |
| Spring | Inspect all flashing after winter. Look for ice damage, lifted edges, or cracked sealant. |
| Summer | Check for rust spots and reapply sealant where needed. Trim branches away from the roof. |
| Fall | Clear leaves and debris from valleys and around flashing. Ensure gutters drain properly. |
| Winter | Monitor for ice dams forming near flashing areas. Remove heavy snow buildup from the roof edges. |
Beyond seasonal checks, you should also inspect your roof flashing after every major storm. High winds, hail, and heavy snowfall can loosen or damage even well-installed flashing. If you are not comfortable climbing onto your roof, a professional roofer can handle these inspections safely.
One practical tip that many homeowners overlook is to check the interior of your attic during a rainstorm. If you see daylight coming through near flashing areas or notice damp spots on the underside of the roof deck, your roof flashing may already be compromised.
For Winnipeg homeowners, the freeze-thaw cycle poses a unique challenge. Water that gets behind roof flashing during a mild day can freeze overnight and expand, pushing the flashing further away from the surface. This cycle repeats throughout winter and can cause significant damage by spring. Scheduling a pre-winter inspection with Zega Roofing is one of the best ways to prevent this type of problem.
If you are dealing with shingle roof replacement, it is the perfect time to have all your roof flashing replaced at the same time, since the shingles will already be removed and the roofer can install fresh flashing across every joint and edge.
Things To Know About Roof Flashing
Before you hire a contractor or attempt any roof flashing work yourself, there are a few important facts to keep in mind.
Roof flashing should always be installed by a licensed and insured professional. Even a small error in placement or sealing can lead to water damage that goes unnoticed for months.
Not all roof flashing materials are compatible with every roofing system. Mixing metals, for example, can cause galvanic corrosion where two different metals react with each other in the presence of moisture.
Building codes in Winnipeg and across Manitoba require proper flashing at all roof penetrations and transitions. Skipping or cutting corners on roof flashing can result in code violations and may affect your home insurance coverage.
The cost of roof flashing repair or replacement depends on the type, material, and extent of the work. For accurate pricing, contact Zega Roofing directly for a free estimate tailored to your property.
Regular maintenance is always cheaper than emergency repairs. A quick annual inspection can catch small roof flashing issues before they become major problems.
If your home has spray foam insulation in the attic, damaged roof flashing can allow moisture to reach the insulation and reduce its effectiveness, making it even more important to keep flashing in good condition.
Protecting Your Home Starts With Proper Roof Flashing
Roof flashing may not be the most visible part of your roofing system, but it plays one of the most important roles in keeping your home dry and structurally sound.
From chimney step flashing to valley and drip edge installations, every piece works together to direct water away from the areas where your roof is most vulnerable. Winnipeg’s harsh winters and unpredictable weather make proper roof flashing even more critical for long-term protection.
If your roof flashing shows signs of wear, or if you are planning a new commercial roofing repair or residential project, the experienced team at Zega Roofing is here to help. Call +1 204-997-2697 or visit zegaroofing.ca/contact to schedule your free inspection today.
Frequently Asked Questions About Roof Flashing
What is a flashing on a roof?
Roof flashing is a thin piece of metal or waterproof material installed at joints, edges, and openings on a roof to prevent water from seeping in. It is placed wherever the roof surface meets a wall, chimney, vent, skylight, or valley. The purpose is to redirect water away from these vulnerable areas and onto the shingles or into the gutters.
Why is roof flashing important?
Roof flashing is important because it protects the most leak-prone areas of your roof from water damage. Without it, rain and snowmelt would flow directly into the joints and gaps in your roofing system. Over time, this causes wood rot, mould growth, and structural deterioration that can cost thousands to repair.
Can I fix roof flashing myself?
Minor sealant touch-ups can be done by a handy homeowner, but full roof flashing repair or replacement should be left to a professional. Incorrect installation can make leaks worse or void your roof warranty. For safe and reliable repairs, contact Zega Roofing in Winnipeg.
How is roof flashing installed?
Roof flashing is installed by cutting metal pieces to size, layering them at roof joints, sealing the edges, and covering the top with shingles. The installation method varies depending on the location, such as chimneys, valleys, or vent pipes. A professional roofer ensures each piece is layered correctly so water flows over the flashing rather than behind it.
What does a roof flashing look like?
Roof flashing looks like thin, flat strips or L-shaped pieces of metal, usually aluminum, steel, or copper, installed along roof joints and edges. Most roof flashing is partially hidden under shingles. The visible portions may appear as small metal strips running along walls, around chimneys, or along the roof edges near gutters.