Roof ice damming is one of the most damaging winter roofing problems Canadian homeowners face, forming when heat escapes through your attic and melts snow that refreezes along the cold eaves of your roof.
Roof ice damming does not form by accident. It is a direct result of uneven roof surface temperatures, and understanding why those temperatures differ is the key to understanding the entire problem.
During winter, heat generated inside your home travels upward and escapes through the attic, especially in homes with poor insulation or inadequate ventilation.
That escaping heat warms the middle and upper sections of the roof deck, melting the snow that sits on top. The melted water then runs down the slope of the roof toward the eaves, which are not heated by attic warmth and remain at the same temperature as the outside air.
When that meltwater reaches the cold eaves, it refreezes and gradually builds up into what we call a roof ice dam.
Over days and repeated freeze-thaw cycles, the dam grows thick and wide. Water pooling behind it has nowhere to go, so it backs up underneath the shingles and into the roof deck. From there, it seeps into your attic, soaks insulation, stains ceilings, damages drywall, and in serious cases causes structural rot in rafters and wall framing.
The problem compounds quickly because wet insulation loses its thermal value, which means even more heat escapes through the attic, which creates more melt, which feeds the dam further. This cycle is exactly why addressing the root cause of roof ice damming matters far more than simply removing ice after it forms.
In Winnipeg and the rest of Manitoba, this cycle is particularly aggressive because temperatures regularly swing between mild daytime warmth and severe overnight lows, creating perfect conditions for repeated ice dam formation throughout the winter season.
How to Recognize the Early Signs of Roof Ice Damming
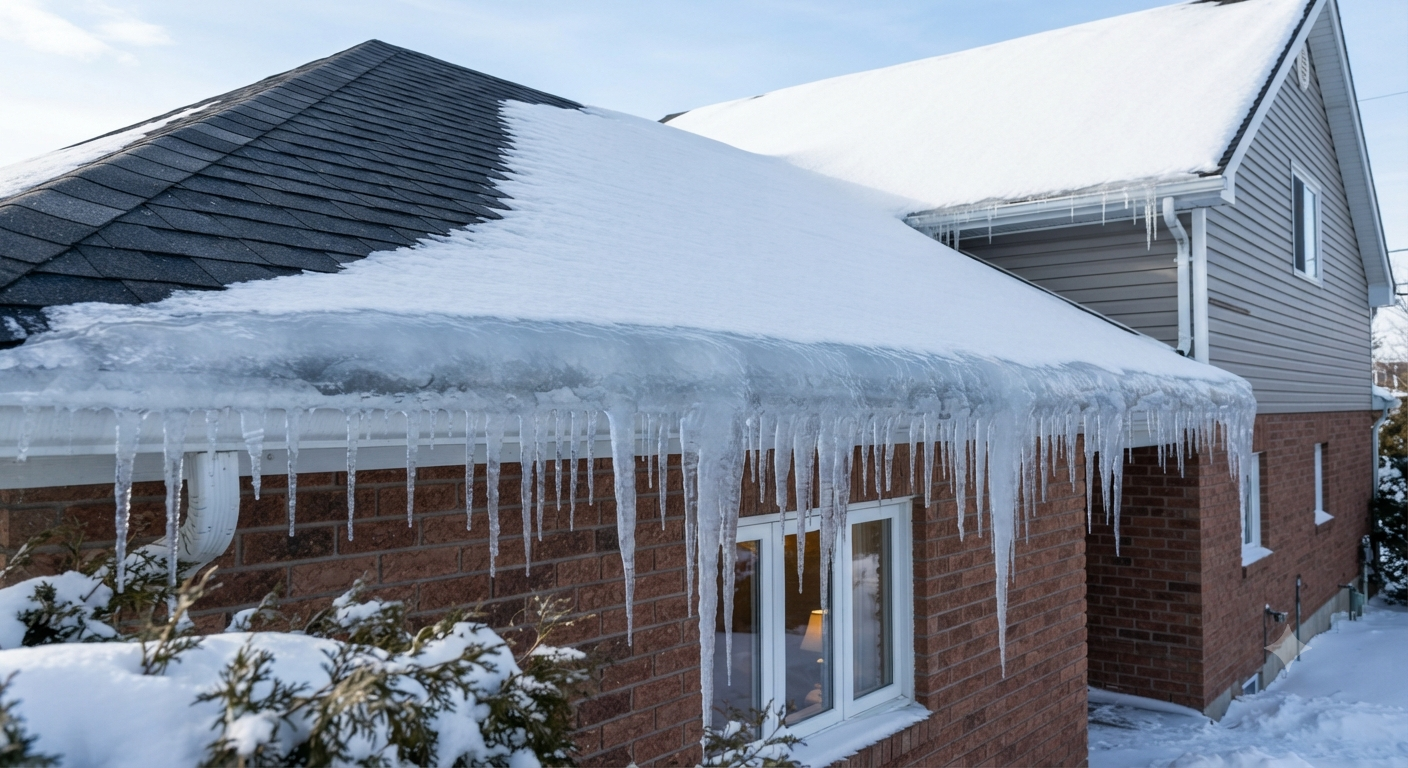
Catching roof ice damming early saves you from expensive interior repairs down the line. The most obvious visual sign is a row of large icicles hanging from your eaves combined with a thick ridge of ice at the edge of the roof.
However, not every icicle means you have a dam, so it is worth knowing what additional signs to look for both outside and inside your home.
On the exterior, check whether snow has melted and cleared from the upper middle section of the roof while the edges remain packed with ice and snow. That uneven pattern is a reliable early indicator of heat loss from below.
You may also notice water staining on the exterior fascia boards or discoloration running down the siding near the roofline.
Inside your home, roof ice damming typically shows up first as water stains on upper-floor ceilings, often near exterior walls. Peeling paint on ceiling surfaces, bubbling drywall tape, and damp or compressed attic insulation are all signs that water has already entered.
In some cases, you may notice frost forming on the underside of the roof deck when you inspect the attic, which signals that moisture is infiltrating the structure. Acting on any of these signs promptly prevents what could be a small repair from becoming a major structural replacement.
How Roof Ice Damming Damages Your Home Over Time
The damage caused by roof ice damming extends far beyond cosmetic ceiling stains, and it tends to build silently over multiple seasons before homeowners realize how serious it has become. Water is incredibly persistent, and once it finds a path beneath your shingles, it works its way into every vulnerable material it contacts.
Below is a breakdown of the most common types of damage associated with roof ice damming and how they develop:
| Damage Type | Where It Happens | How It Develops |
| Shingle lifting and cracking | Roof edge and eave zone | Ice expansion forces shingles upward, breaking adhesive seals |
| Roof deck rot | Plywood or OSB sheathing | Repeated moisture saturation leads to wood decay over time |
| Insulation degradation | Attic floor or rafter bays | Wet insulation compresses and loses R-value permanently |
| Ceiling and drywall damage | Upper floors near exterior walls | Water infiltration stains and weakens interior surfaces |
| Fascia and soffit deterioration | Eave trim and overhang area | Prolonged ice contact causes wood rot and paint failure |
| Mold and mildew growth | Attic, wall cavities, insulation | Persistent moisture creates ideal conditions for fungal growth |
Each of these damage types carries its own repair cost, and when several occur together, the financial impact of untreated roof ice damming becomes substantial.
More importantly, mold growth in wall cavities and attic spaces poses health risks beyond just property damage, making early intervention a matter of both structural and occupant wellbeing.
How to Address Roof Ice Damming in Both the Short and Long Term
Immediate Steps You Can Take This Winter
When you discover active roof ice damming, your first priority is reducing water intrusion while avoiding damage to your roofing materials.
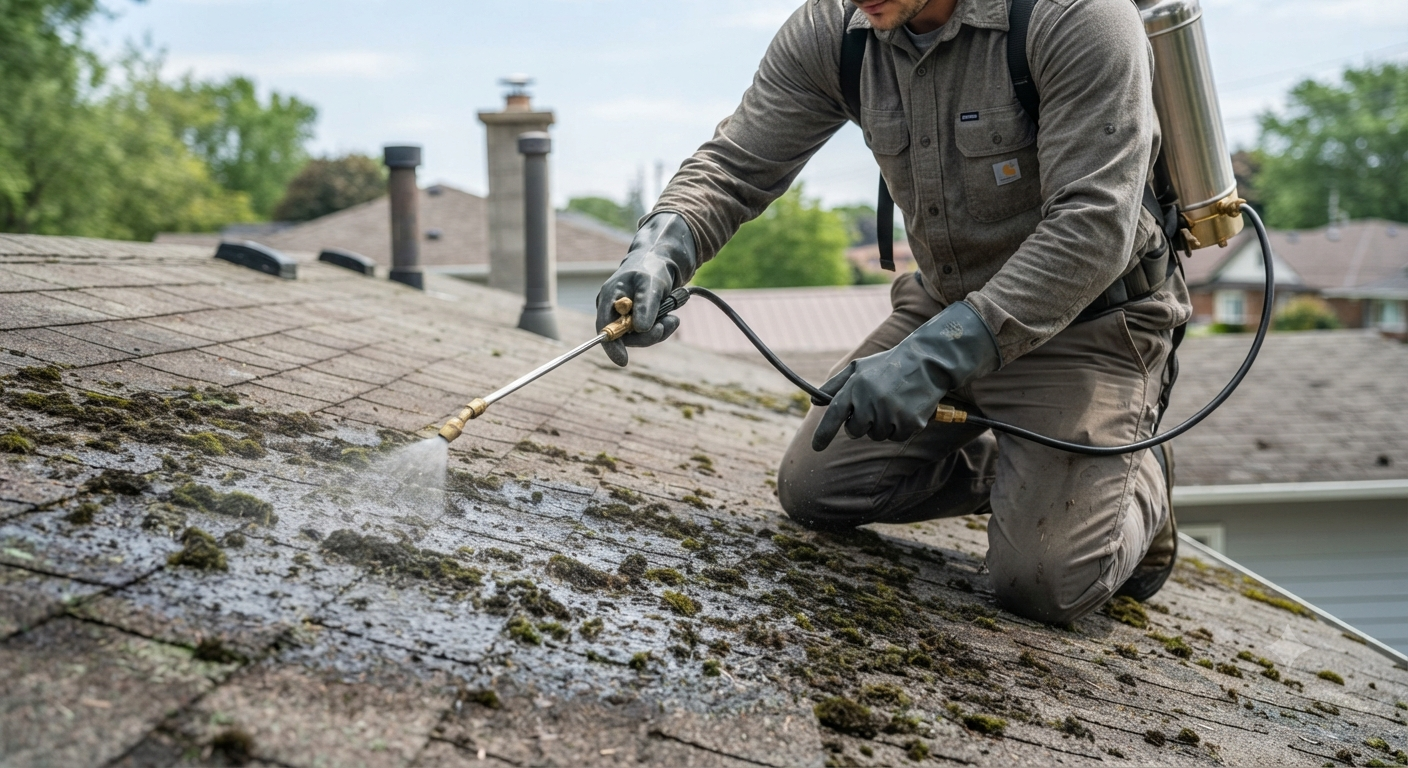
One of the most practical short-term approaches is using a roof rake, which is a long-handled tool designed to pull snow off the roof from the ground level without requiring you to climb onto the roof surface.
Removing accumulated snow from the lower few feet of the roof before it has a chance to melt and refreeze significantly reduces the volume of water feeding the ice dam.
Another short-term tactic is creating channels through the ice dam to allow trapped water to drain off the roof rather than back up under the shingles. A common method involves filling a tube stocking with calcium chloride ice melt and laying it perpendicular across the dam, bridging the ice edge and the roof above.
This creates a melted channel that releases pooled water. Avoid using rock salt or sodium chloride products, as these can corrode metal flashing, damage shingles, and harm landscaping below.
Long-Term Prevention Strategies That Work
Eliminating the root cause of roof ice damming requires addressing how heat moves through your home. The three most effective long-term strategies are improving attic insulation, enhancing attic ventilation, and installing proper roof membrane protection along the eaves.
Upgrading attic insulation keeps heat inside your living spaces where it belongs instead of allowing it to escape through the ceiling and warm the roof deck unevenly. An attic that maintains a temperature close to the outdoor air temperature will not create the warm upper roof zone that melts snow and feeds ice dams.
Pairing improved insulation with a well-designed ventilation system, including soffit vents for cold air intake and ridge vents for warm air exhaust, allows the attic to breathe consistently without temperature spikes.
Installing an ice and water shield membrane along the lower edge of the roof provides a critical backup layer of waterproofing in the event that water backs up behind a dam.
This self-adhering membrane seals tightly around nails and fasteners, preventing water from finding a path through the roof deck even when shingles are compromised.
For Winnipeg homes, building codes generally require this membrane to extend at minimum a certain distance up from the eave, though professional roofers often recommend extending it further in exposed locations.
For homeowners who have tried insulation and ventilation upgrades with limited success, electric heat cables installed along the eave zone offer another layer of protection.
These cables create a warm path for meltwater to follow, preventing the freeze-thaw cycle from building a dam. They are not a replacement for proper insulation but serve as a valuable supplement in particularly vulnerable roof sections.
Which Roof Types Handle Roof Ice Damming the Best
Not all roofs respond to roof ice damming the same way, and the pitch, material, and design of your roof all influence how susceptible it is to ice dam formation and damage.
| Roof Type | Ice Dam Vulnerability | Why |
| Steeply pitched roof | Lower vulnerability | Steeper slope sheds snow faster before melt cycles begin |
| Low-slope or flat roof | Higher vulnerability | Snow accumulates longer, giving more time for ice dam formation |
| Well-insulated cold roof | Lowest vulnerability | Minimal heat escape keeps roof surface temperature uniform |
| Roof with attic bypasses | High vulnerability | Gaps around fixtures allow heat spikes that accelerate uneven melting |
A steep-pitched roof sheds snow more quickly, reducing the window during which meltwater can refreeze at the eaves. Low-slope roofs hold snow for much longer, creating extended exposure to the conditions that feed ice dams.
Regardless of pitch, the most important variable is how consistently cold the roof deck surface remains, which depends entirely on insulation and ventilation quality rather than aesthetic choices.
Homes with complex roof designs that include multiple valleys, dormers, and intersecting planes are also more vulnerable because those transition zones naturally trap snow and create pockets where water pools rather than running off cleanly.
A simple gable roof with consistent ventilation almost always performs better in cold climates than an architecturally complex roofline with multiple penetrations and irregular planes.
If you are planning to replace your shingles as part of a winter protection upgrade, that is the right time to also address insulation, ventilation, and membrane installation in one coordinated project.
Homeowners dealing with damaged roofing from past ice dam seasons should also look at available residential roof installation options to understand what a full replacement project involves and whether it is the right next step.
When to Call a Professional About Roof Ice Damming
There is a point at which roof ice damming moves beyond homeowner maintenance and into professional roofing territory, and knowing where that line is saves you from unsafe situations and potentially costlier mistakes.
If the ice dam is large, you are not comfortable working at heights, or you notice signs of interior water damage, calling a qualified roofing professional is the right decision without hesitation.
Professional roofers have access to equipment and techniques not available to most homeowners, including low-pressure steam systems that melt ice dams quickly without damaging shingles or membranes. Unlike manual chipping, steam removal does not risk cutting through roofing materials, and it eliminates ice far faster than calcium chloride alone.
Beyond emergency removal, a roofing professional can assess the full extent of damage to your shingles, underlayment, flashing, and roof deck and give you an honest picture of what repairs are needed before the next freeze cycle hits. They can also evaluate your attic insulation and ventilation configuration to identify the underlying conditions driving the ice dams in the first place.
If you are looking for experienced, licensed roofing help in Winnipeg, Zega Roofing provides thorough roof inspections, ice dam assessments, and full repair services built for Manitoba’s demanding winter climate. You can also explore options for roof membrane installation as part of a comprehensive ice dam prevention strategy. For pricing details and to schedule a consultation, reach out directly to Zega Roofing at +1 204-997-2697.
IMAGE SUGGESTION: A professional roofer in safety gear using a low-pressure steam hose to remove a large ridge of ice from the eave of a residential roof during winter, exterior daylight, snow visible on the surrounding roof and yard, no text overlay.
Keeping Your Roof Protected From Ice Damming Season After Season
Roof ice damming is not something you resolve once and forget about. It requires seasonal attention, proactive maintenance, and the right structural conditions inside your attic to stay ahead of it year after year. Every autumn before snow arrives, inspect your attic for signs of air leaks around fixtures, check that soffit vents and ridge vents are clear and unobstructed, and confirm that your insulation is dry and evenly distributed without gaps.
After heavy snowfall events, using a roof rake to remove snow from the lower sections of the roof reduces the raw material that ice dams need to form. Staying ahead of snow accumulation is far easier than dealing with a fully formed dam in the middle of a cold snap.
Track any interior signs from past winters such as old ceiling stains or paint bubbling and have those areas professionally assessed to confirm there is no hidden moisture damage that could develop into mold or structural deterioration over the coming months. Roof ice damming is a manageable problem when treated systematically, and homes that receive consistent attention rarely suffer the severe damage that results from years of neglect.
Frequently Asked Questions About Roof Ice Damming
How to fix ice damming on roof?
Remove snow promptly, create drainage channels with calcium chloride, and address attic insulation and ventilation to stop the root cause.
Fixing an active ice dam starts with safely removing snow from the lower portion of the roof using a roof rake to cut off the water supply feeding the dam. From there, laying calcium chloride in a tube stocking across the dam creates a melt channel that allows trapped water to drain before it backs up under the shingles. For large or stubborn dams, professional steam removal is the safest and most effective option. Long-term fixing means upgrading attic insulation, sealing air bypasses, and improving ventilation so the roof deck stays cold and uniform throughout winter.
What is the best roof to prevent ice dams?
A steeply pitched, well-insulated cold roof with proper ventilation and a full ice and water shield membrane along the eaves is the most resistant to ice dam formation.
Steep pitches shed snow faster, reducing the time snow sits and melts unevenly. The more important factor, however, is keeping the entire roof surface cold by ensuring your attic insulation and ventilation work together to prevent heat from warming the deck selectively. Combining these structural factors with a quality waterproofing membrane at the eave zone creates a roof system that resists roof ice damming even in severe Manitoba winters.
Is there a permanent solution for ice dams?
While no single fix is guaranteed forever, improving attic insulation, sealing air leaks, and installing proper ventilation comes closest to a permanent solution.
Addressing the root cause of roof ice damming, which is uneven heat distribution across the roof deck, is the closest thing to a permanent fix. Homes where attic bypasses are fully sealed, insulation meets current performance standards, and ventilation moves air consistently from soffit to ridge rarely develop significant ice dams. Electric heat cables along the eave can supplement these measures in particularly exposed locations.
Do I need to repair the roof after an ice dam?
Not always, but a professional inspection is essential to confirm whether shingles, underlayment, or decking have been compromised.
Even when a roof looks intact after an ice dam, damage is often hidden. Lifted shingles, broken adhesive bonds, and saturated roof deck sheathing may not be visible from the ground. Interior water stains are a strong indicator that the roof has been breached. Having a professional evaluate the roof after a significant ice dam season allows you to address damage before it worsens rather than discovering it only after the next event causes further deterioration.
Should I break up ice dams myself?
No. Chipping or hammering ice dams can cut through shingles, damage flashing, and create safety hazards.
Breaking ice dams manually with a chisel or hammer risks cutting through shingles and the waterproofing membrane beneath them, turning a water infiltration problem into a gaping hole in your roof. It is also physically dangerous given the height, ice, and cold involved. The safer DIY approach is calcium chloride channels, while the most effective and damage-free approach is professional steam removal. Leave physical ice breaking to situations where no other option exists, and always prioritize safety first.