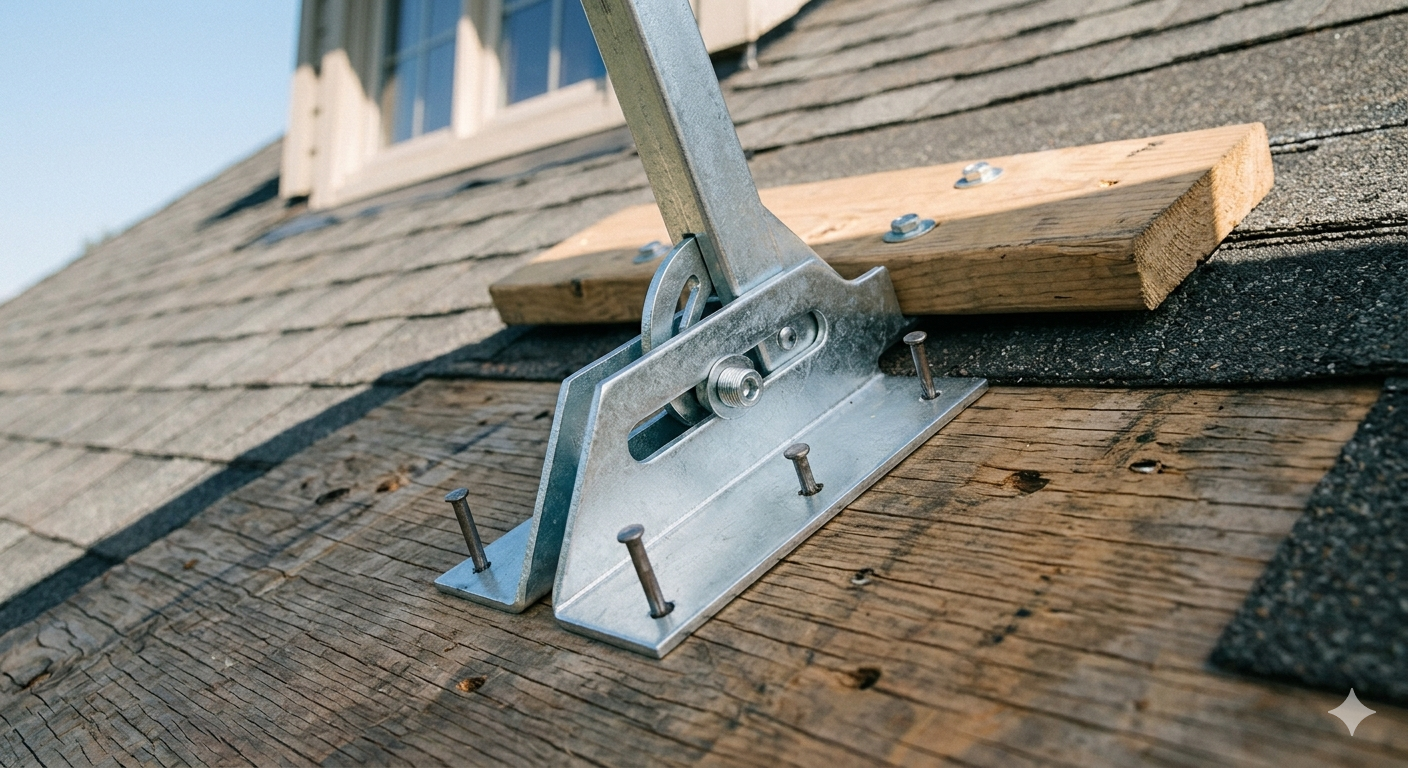
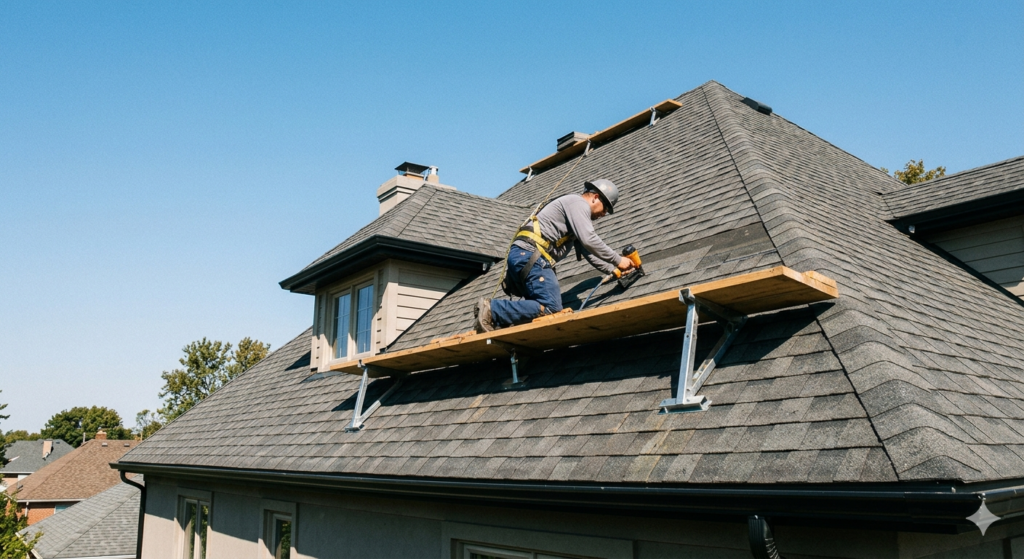
Roof jacks serve as temporary support brackets that get nailed directly into the roof deck to hold a horizontal plank in place, creating a level walking surface on a sloped roof. Without this kind of support, workers would be forced to balance directly on shingles or underlayment, which becomes extremely dangerous once the pitch increases beyond a gentle slope. The bracket itself is usually made from galvanized steel and features an adjustable arm that can be set to different angles depending on how steep the roof happens to be.
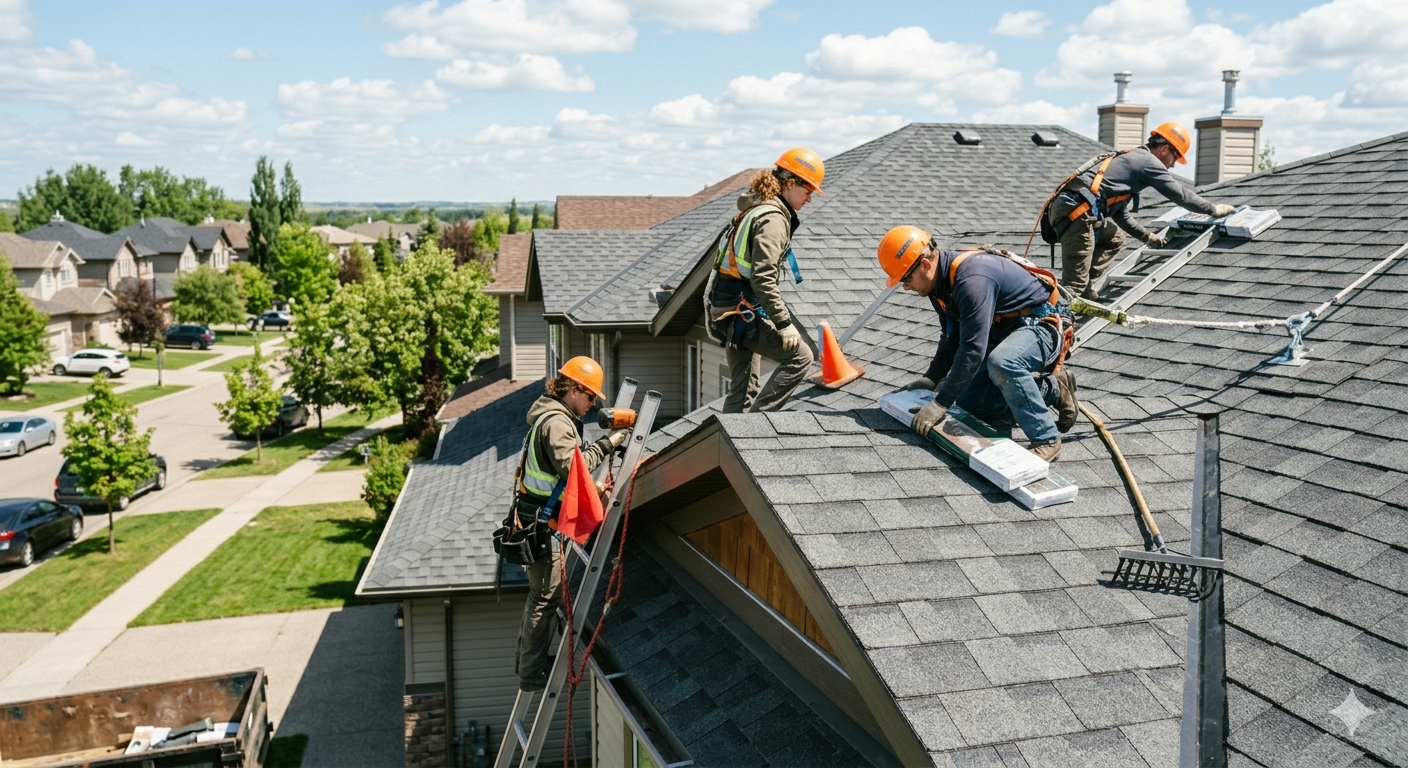
During a full roof replacement or a major repair, crews will typically install several of these brackets in a row across the width of the roof, then lay a sturdy plank or board across them to form a continuous platform. This setup allows workers to carry shingles, tools, and equipment from one section of the roof to another without constantly fighting gravity. It also gives them a stable spot to kneel while nailing down shingles, which improves accuracy and reduces fatigue over a long workday.
Beyond simple foot traffic, these brackets also help distribute weight more evenly across the roof structure. Concentrated weight in one spot, especially on older decking, can cause stress points or even minor damage if a worker is forced to stand in the same place for extended periods. By spreading the load across a plank supported by multiple brackets, the pressure is shared more evenly, which protects the integrity of the roof deck during the project.
Another important use is material staging. Bundles of shingles, boxes of nails, and other supplies can be placed on the platform created by these brackets, keeping everything within arm’s reach and reducing the number of trips up and down the ladder. This not only speeds up the project but also reduces the overall risk of accidents, since fewer trips across a sloped surface naturally means fewer chances for a slip.
What Are Roof Pipe Jacks For and How Do They Function?
Roof pipe jacks, often called pipe boots or pipe flashings, are designed specifically to create a watertight seal around any pipe, vent, or stack that penetrates through the roof surface. These components typically consist of a flexible rubber or synthetic collar attached to a metal or plastic base that sits flush against the shingles or roofing material.
The base of the pipe jack is slid underneath the upper rows of shingles and layered over the lower rows, following the same shingle pattern that sheds water down the slope. This layering technique, sometimes called shingle integration, ensures that rainwater naturally flows over the top of the flashing rather than getting trapped underneath it. The rubber collar then stretches tightly around the pipe itself, forming a snug barrier that prevents moisture from seeping into the gap between the pipe and the roof deck.
Over time, the rubber collar on these fittings can dry out, crack, or shrink due to constant exposure to sunlight, temperature swings, and precipitation. When this happens, even a small gap around the pipe can allow water to drip down into the attic space, leading to insulation damage, wood rot, or mold growth if left unaddressed. This is one of the most common sources of hidden leaks in older homes, since the surrounding shingles often look perfectly fine while the seal underneath has already failed.
Replacing a worn pipe boot is a relatively contained job compared to a full roof replacement, but it still requires careful removal of surrounding shingles, proper layering of the new flashing, and secure fastening to prevent future movement. Because the quality of this seal directly affects how dry your attic and ceiling stay during heavy rain or melting snow, many homeowners choose to have this work done by experienced professionals rather than attempting it themselves.
What Does a Roof Jack Look Like and How Can You Identify One?
A roof jack used for worker support typically resembles a triangular or fan shaped metal bracket made from galvanized steel, with one flat edge designed to sit against the roof surface and a series of slots or notches along the angled edge where a wooden plank can rest. The bracket usually includes pre punched holes near its base, allowing roofing nails to be driven directly through the metal and into the rafters or decking underneath for a secure hold.
These brackets often come with an adjustable mechanism, sometimes a sliding bar or hinged arm, that lets the user change the angle of the plank slot to match the pitch of the roof. On steeper roofs, the adjustment is set wider so the resulting platform stays as level as possible, while on gentler slopes the setting is brought closer to flush. The overall size of a single bracket is generally compact enough to fit in a standard tool bag, though most projects require several of them spaced evenly along the roofline.
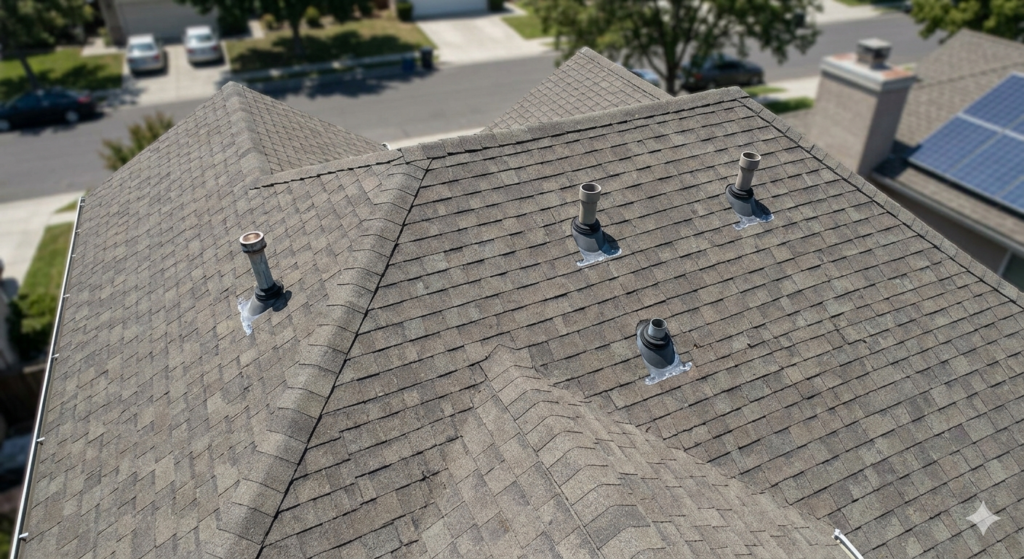
In contrast, the pipe version looks completely different and is far more recognizable to most homeowners. It typically appears as a flat, square or rectangular base made of aluminum, galvanized steel, or a durable plastic composite, with a raised rubber or neoprene collar in the center shaped like a small cone or cylinder. This collar is what wraps around the vent pipe, and it often comes in a range of sizes to accommodate different pipe diameters commonly found on residential roofs.
When viewed from the ground or from a drone photo, the pipe style appears as small protrusions scattered across the roof surface, usually near bathrooms, kitchens, or furnace exhaust locations. The base color often matches the surrounding shingles to keep the appearance as discreet as possible, while the rubber collar is usually black or gray and stands out slightly due to its texture and slight bulge around the pipe.
How to Use Roof Jacks on an Existing Roof Without Causing Damage
Installing support brackets on an existing roof requires a careful approach to avoid creating unnecessary holes or weakening the surrounding shingles, especially if the roof is still in otherwise good condition. The first step involves identifying the rafters underneath the decking, since the brackets need to be nailed into solid framing members rather than just the thin layer of plywood or oriented strand board that makes up the deck itself.
Once the rafter locations are marked, the installer carefully lifts the edge of the shingle row where the bracket will be placed, sliding the flat portion of the bracket underneath so that it sits between two shingle courses. This positioning allows the bracket to be secured with nails driven through both the bracket and the shingle layer into the rafter below, while still keeping the shingle edge able to lay back down over the top of the bracket once installation is complete.
After the brackets are nailed into place and spaced evenly across the work area, a sturdy plank, typically a two by ten or similar dimensional lumber, is laid horizontally across the slots or notches in each bracket. The plank should extend across at least three brackets whenever possible to distribute weight properly and prevent any bouncing or flexing while workers move across it.
Steps for Removing Roof Jacks After the Job Is Done
- Remove the plank first by lifting it carefully off the bracket slots, checking for any nails or debris that may have shifted during the project before setting it aside.
- Lift the shingle edge gently above each bracket to expose the nail heads that were driven through during installation, being careful not to crack or tear the shingle material itself.
- Remove the nails carefully using a flat pry bar, working slowly to avoid bending the surrounding shingles or damaging the underlying felt paper.
- Slide the bracket out from beneath the shingle layer once all fasteners have been removed, checking that no metal fragments remain stuck in the roofing material.
- Reseal the nail holes with a small amount of roofing sealant applied directly over each hole left behind, then press the shingle edge back down firmly into its original position.
- Inspect the area thoroughly for any signs of cracking, lifted shingles, or exposed nail holes that may need additional sealant before the crew moves to the next section.
Following each of these steps in order helps ensure that once the brackets are removed, the roof returns to a fully sealed and weatherproof condition with no lingering gaps or exposed fasteners. Skipping the resealing step is one of the most common mistakes that can lead to small leaks developing months after a project has been completed, since an unsealed nail hole provides a direct path for water to enter the decking below.
For homeowners who notice unusual marks, small holes, or slightly raised shingle edges after a roofing project, scheduling a follow up inspection with residential roof installation specialists can help confirm that every temporary support point was properly closed up and resealed before the next rainfall arrives.
What Is the Purpose of a Jack in Roofing Work and Why Does It Matter?
The overarching purpose of these tools, in both their worker support and pipe sealing forms, is to make roofing work safer, more efficient, and longer lasting by addressing two very different but equally important challenges on a sloped surface. On one hand, the support brackets exist purely for human safety, giving workers a stable foundation that dramatically reduces the risk of slips, falls, and the kind of awkward body positioning that leads to long term strain injuries among roofing crews.
On the other hand, the pipe sealing versions exist to solve a structural and weatherproofing challenge, since every penetration through a roof surface represents a potential entry point for water if not handled correctly. Without a properly fitted seal around each vent or pipe, even a well installed shingle roof can develop hidden leaks that slowly damage the wood framing, insulation, and ceiling drywall over months or years without being noticed.
When you consider both purposes together, it becomes clear why these components are considered essential rather than optional on almost every sloped roofing project. A roof without adequate worker support during installation is far more likely to have mistakes, uneven shingle lines, or rushed work caused by workers trying to move quickly across an unstable surface. Meanwhile, a roof without proper pipe sealing is essentially guaranteed to develop leaks at some point, regardless of how well the rest of the shingles were installed.
This is also why experienced contractors treat both elements as a standard part of their process rather than something to skip on smaller jobs. The cost of properly supporting a crew during installation, or properly sealing a vent pipe, is minor compared to the cost of repairing water damage, replacing rotted decking, or dealing with an injury claim resulting from a fall.
| Roof Jack Type | Primary Purpose | Where Used | Material Commonly Used |
| Worker support bracket | Provides safe walking and kneeling platform | Sloped shingle roofs during install or repair | Galvanized steel |
| Pipe flashing collar | Seals roof penetrations against water | Around plumbing vents, exhaust pipes, stacks | Aluminum base with rubber or neoprene collar |
| Adjustable angle bracket | Matches platform to roof pitch | Steep slope residential roofs | Galvanized steel with sliding arm |
| Standard pipe boot | Weatherproofs round pipe penetrations | Bathroom and kitchen vent stacks | Plastic composite with rubber collar |
Comparing Roof Jacks to Other Roof Safety and Sealing Options
| Comparison Factor | Roof Jacks (Support Brackets) | Roof Anchors | Pipe Boots vs Lead Flashing |
| Main Function | Creates a walking platform | Provides a tie off point for harnesses | Pipe boots seal pipes with rubber, lead flashing seals using a moldable metal sleeve |
| Reusability | Reusable across multiple jobs if removed carefully | Often left in place or reused with new anchor points | Pipe boots typically replaced every several years, lead flashing can last much longer |
| Ease of Installation | Moderate, requires nailing into rafters | Requires precise placement over structural members | Pipe boots are quicker to install than shaping lead flashing |
| Best Suited For | General foot traffic and material staging | Fall protection during steep slope work | Pipe boots for most residential vents, lead flashing for specialty applications |
Why is this comparison useful for homeowners planning a project? Understanding how these different tools work together gives you a clearer picture of what a thorough, professional crew should be using on your roof, rather than cutting corners with makeshift solutions.
How do these options fit into an overall safety and waterproofing plan? Each one addresses a specific gap, support brackets handle worker movement, anchors handle fall arrest systems, and pipe boots or flashing handle penetrations, so a well rounded project typically involves more than one of these elements working together. Which option is best for your situation?
For most standard residential homes, a combination of properly placed support brackets during installation and high quality pipe boots around every vent represents the most practical and cost effective approach, while anchors become more relevant on steeper pitches or larger commercial structures where fall protection regulations are stricter.
If you are exploring options for an upcoming shingle replacement and want to understand how these safety and sealing components fit into the overall scope of work, browsing through shingle roof replacement services can give you a better sense of what a complete project typically includes from start to finish.
Things to Know About Roof Jacks Before Your Next Project
There are several practical details worth understanding before any roofing project begins, especially if you want to have an informed conversation with your contractor about the safety measures and sealing components being used on your home. First, the spacing between support brackets matters significantly, since brackets placed too far apart can cause the plank between them to sag or bounce under weight, creating an unstable surface even though the brackets themselves are properly secured.
Second, the size and type of pipe boot needs to match the diameter of the vent pipe precisely, since a collar that is too loose will not form a tight seal no matter how well it is installed, while one that is too tight can tear during installation or shrink prematurely due to excess stretching. Third, the angle setting on adjustable support brackets should always be checked against the actual roof pitch before nailing begins, since a mismatched angle can leave the resulting platform tilted, which increases the risk of materials sliding off during the workday.
Fourth, weather conditions play a significant role in both installation and removal, since cold temperatures can make shingles brittle and more likely to crack when lifted, while hot temperatures can make rubber collars on pipe boots more pliable but also more prone to stretching out of shape if handled roughly. Fifth, the age and condition of the existing roof deck should always be assessed before nailing any brackets into place, since older or water damaged decking may not provide a secure enough hold for the fasteners, potentially leading to a bracket pulling loose mid project.
Finally, homeowners should always ask whether their roofing crew plans to properly reseal every nail hole left behind by temporary brackets, since this single step often makes the difference between a roof that performs flawlessly for years and one that develops small, hard to trace leaks within the first rainy season. For pricing information related to any of these services, simply contact Zega Roofing directly to discuss your specific roof and receive a tailored estimate.
Wrapping Up the Role of Roof Jacks in Roofing Safety
Roof jacks play a quiet but essential role in nearly every sloped roofing project, supporting workers safely while also keeping vent pipes properly sealed against the elements. Whether you are planning a full replacement or simply addressing a leak near a vent stack, understanding how these components function helps you have a more informed conversation with your roofing crew.
For homeowners in Winnipeg looking for a team that handles every detail with care, from proper bracket placement to high quality pipe sealing, you can explore the gallery of completed projects to see this kind of careful workmanship in action, or reach out through the contact page to discuss your upcoming roofing needs.
Frequently Asked Questions About Roof Jacks
What are roof jacks for?
They create a safe, stable platform for workers on sloped roofs.
Roof jacks are temporary brackets nailed into the roof deck to support a plank, allowing crews to walk and work safely on steep surfaces without sliding.
What are roof pipe jacks for?
They seal the gap around vent pipes to keep water out.
Pipe jacks, also called pipe boots, fit around vent stacks and layer with shingles to create a watertight barrier that prevents leaks at roof penetrations.
What does a roof jack look like?
A metal bracket or a rubber collared pipe flashing.
The support type looks like a triangular galvanized steel bracket with slots for a plank, while the pipe type looks like a flat base with a rubber cone around a pipe.
How to use roof jacks on an existing roof?
Slide them under shingles, nail into rafters, then add a plank.
Lift shingle edges to locate rafters, nail the bracket securely into framing, lay a plank across multiple brackets, then remove and reseal nail holes afterward.
What is the purpose of a jack?
Safety support and watertight sealing on roofs.
The purpose is twofold, providing workers a stable platform during installation and ensuring pipe penetrations remain fully sealed against moisture year round.