Roofing edge flashing is a thin metal or composite barrier installed along the perimeter of your roof to direct water away from the fascia, walls, and underlying roof deck.
Without properly installed roofing edge flashing, water can silently seep into your home’s structure over months and years, causing rot, mould, and costly interior damage that goes undetected until it becomes a major repair.
This article covers everything you need to know about roofing edge flashing, including how it works, the different types available, why the material you choose matters, how installation works step by step, and when it makes sense to call a professional. You will also find a practical comparison table, a Things To Know section, and answers to the most common questions homeowners ask about roof edge protection.
Why Roofing Edge Flashing Matters More Than Most Homeowners Realize
Most people think about shingles, gutters, and underlayment when they consider roof protection, but roofing edge flashing is the unsung component that ties everything together. The edge of a roof is one of the most vulnerable points on any structure because it is where wind-driven rain hits hardest, where water tends to pool during heavy downpours, and where temperature changes in a place like Winnipeg can cause repeated freeze-thaw cycles that stress materials over time.
When roofing edge flashing is correctly installed, it creates a continuous barrier that channels water directly into the gutter system rather than letting it run behind the fascia board or absorb into the roof deck. Without it, water follows the path of least resistance and ends up exactly where you do not want it: inside your walls, in your attic insulation, and eventually on your ceiling. A single winter in Manitoba is enough to turn a small gap in roofing edge flashing into a significant water damage problem, which is why this detail is never something to skip during a new installation or replacement.
Beyond water management, roofing edge flashing also adds a finished, clean appearance to the roofline and helps hold the first course of shingles in place so they do not curl or lift in high winds. It acts as both a functional waterproofing element and a structural anchor, making it genuinely one of the most valuable components in any well-built roofing system.
If you are considering a full roof replacement, learning more about residential roof installations gives you a broader picture of how each component works together to protect your home for decades.
How Does Roofing Edge Flashing Actually Work?
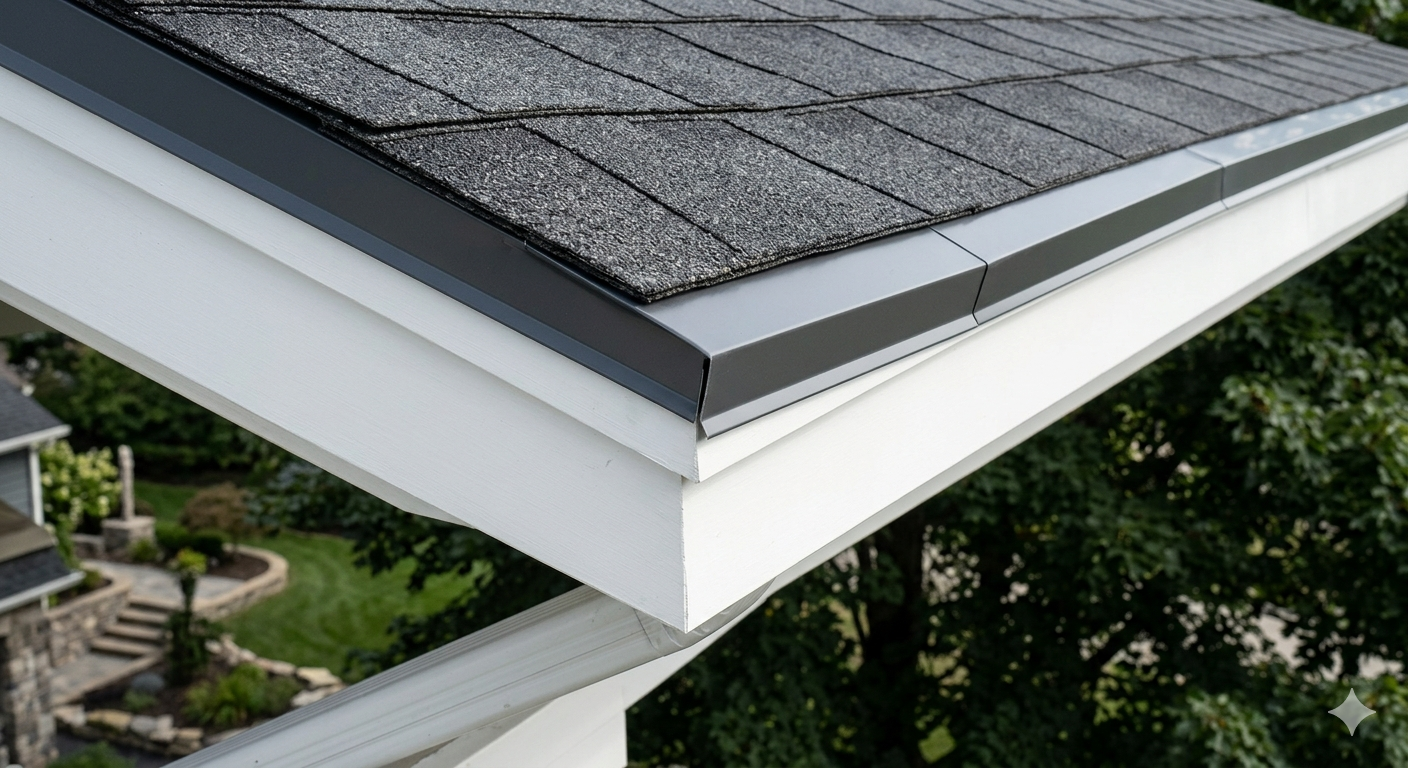
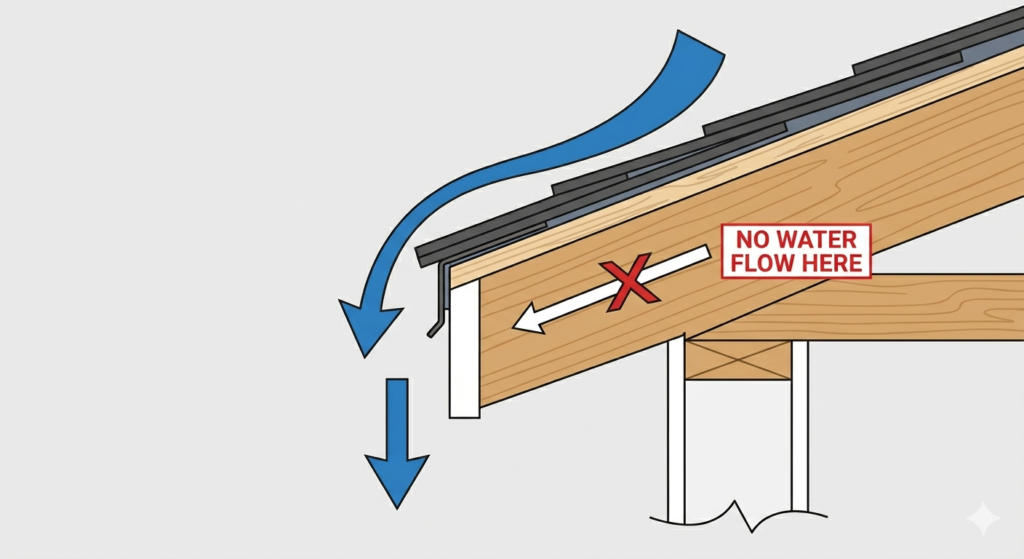
Roofing edge flashing works by sitting at the junction between the roof deck and the fascia board, physically bridging that gap so water cannot penetrate it. The flashing piece extends horizontally across the top of the fascia and then angles downward over its face, creating a drip edge effect that sends water outward and away from the building envelope rather than backward toward the structure.
The Basic Mechanics of Water Direction
When rain hits the surface of your roof, it travels downward toward the eaves. Without roofing edge flashing, a portion of that water hits the edge of the sheathing and wicks backward due to capillary action, a phenomenon where water is pulled into tiny spaces between materials by surface tension alone.
Even a small amount of daily moisture doing this repeatedly will cause the wood sheathing to absorb water, swell, and eventually rot. Roofing edge flashing interrupts this process entirely by placing a non-absorbent metal barrier at that junction so the water has no material to wick into and is instead directed outward.
How It Connects to the Rest of the Roofing System
Roofing edge flashing is not installed in isolation. It is layered in combination with the underlayment and shingles in a specific order that ensures any water that does penetrate the outer layer is still captured and directed correctly.
The flashing is typically installed over the underlayment at the eaves but under the underlayment at the rakes (the angled sides of the roof), which ensures water always flows on top of the flashing rather than behind it. This layering sequence is a standard part of professional shingle roof replacement work and is critical to the long-term waterproofing performance of the entire roofing system.
What Happens When It Fails
When roofing edge flashing is improperly installed, corroded, or simply missing, the consequences show up quickly in a wet Manitoba spring or after a heavy snowmelt. Water backs up under the shingles, saturates the felt underlayment, and eventually reaches the roof deck. From there, it travels into the attic and down wall cavities.
Homeowners often notice staining on interior ceilings or walls, but by the time those stains appear, the structural damage has already been happening for some time. Replacing damaged decking, insulation, and drywall is always significantly more expensive than having the roofing edge flashing installed correctly from the beginning.
Types of Roofing Edge Flashing and Which One Is Best
Not all roofing edge flashing is the same, and the type you choose should depend on your climate, your roofing material, and the specific design of your home. There are several common profiles in use today, each with a distinct shape that performs differently depending on the situation.
Common Flashing Profiles Explained
Type C (Standard Drip Edge): This is the most widely used profile for residential roofing. It has a simple L-shaped design with a slight outward flare at the bottom that pushes water away from the fascia. It is suitable for most standard-pitch residential roofs and works well under asphalt shingles.
Type D (T-Style Drip Edge): This profile has a more pronounced horizontal lip that extends further under the shingles, offering greater coverage of the roof deck edge. It performs particularly well in areas that receive heavy rainfall or where ice damming is a concern, making it a strong choice for Winnipeg’s climate.
Type F (Extended Flashing): Designed specifically for re-roofing situations where new shingles are being installed over an existing layer, this profile provides extra coverage to bridge the difference in height between the old and new roofing materials.
Gutter Apron Flashing: This specialized type is used when a home has gutters and is designed to direct water from under the shingles directly into the gutter rather than allowing it to fall behind it.
| Flashing Type | Best Application | Key Advantage | Climate Suitability |
|---|---|---|---|
| Type C (L-Shape) | Standard new installations | Simple, cost-effective, widely available | Moderate rainfall areas |
| Type D (T-Style) | High rainfall, ice dam zones | Greater deck edge coverage | Excellent for Winnipeg winters |
| Type F (Extended) | Re-roofing over existing layers | Bridges height differences cleanly | All climates |
| Gutter Apron | Homes with attached gutters | Directs water precisely into gutter | All climates |
For most Winnipeg homeowners, the Type D profile is the most practical choice because it offers the broadest coverage at the deck edge and is specifically well-suited to the freeze-thaw cycles and heavy snowmelt that characterize Manitoba winters.
What Material Is Used for Roofing Edge Flashing?
The material used for roofing edge flashing significantly affects its lifespan, performance, and overall value. Each material comes with trade-offs between durability, cost, and ease of installation, and understanding those differences helps you make an informed decision for your specific home.
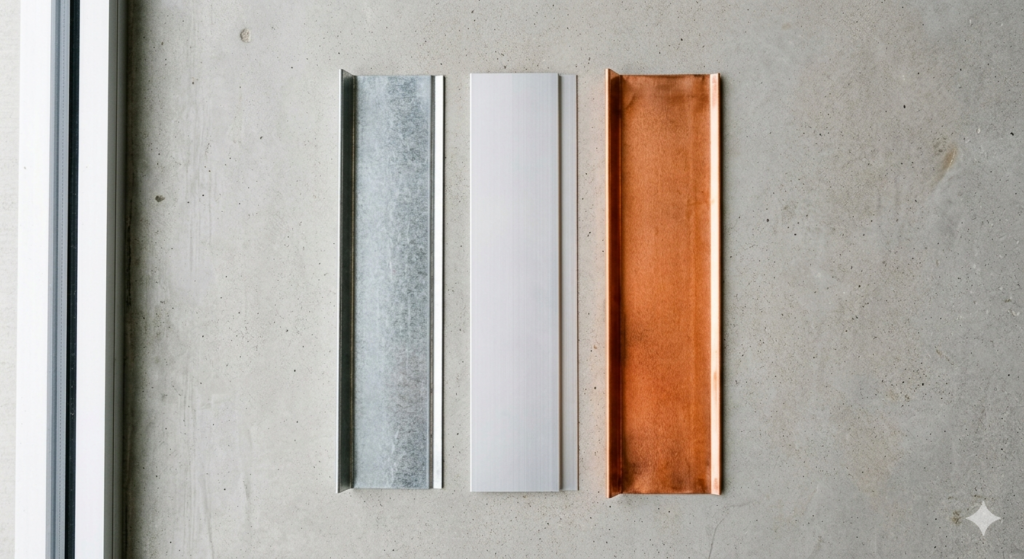
Galvanized Steel: This is the most common material used in Canadian residential roofing. It is coated with a layer of zinc to resist rust, is relatively affordable, and holds up well to physical impact from debris. Its main limitation is that the zinc coating can wear down over time in very wet environments, eventually allowing rust to form.
Aluminum: Lightweight and naturally rust-resistant, aluminum roofing edge flashing is a popular upgrade from galvanized steel. It is easy to bend and cut on site, which makes it practical for roofs with complex edge profiles. However, it can react chemically with concrete or masonry in certain conditions, so it is typically best suited for wood-framed structures.
Copper: Copper roofing edge flashing is the premium option, offering exceptional longevity and a distinctive appearance that develops a patina over time. It can last for several decades without degrading and requires virtually no maintenance. The higher material cost means it is generally used on higher-end homes or heritage properties where aesthetics are a priority alongside performance.
PVC and Plastic Composites: These are sometimes used in lower-cost applications but are generally not recommended for cold climates like Winnipeg because plastic can become brittle at low temperatures and crack under the stress of freeze-thaw expansion.
| Material | Lifespan Estimate | Rust Resistance | Best For |
|---|---|---|---|
| Galvanized Steel | 20-30 years | Moderate (zinc coating) | Standard residential roofs |
| Aluminum | 30-40 years | High (naturally rust-proof) | Wood-framed homes, complex edges |
| Copper | 50+ years | Excellent (develops patina) | High-end and heritage properties |
| PVC/Composite | 10-15 years | High | Mild climate applications only |
For pricing information on materials and installation, contact Zega Roofing directly for an accurate estimate based on your home’s specific requirements.
How Is Roofing Edge Flashing Installed on a Residential Roof?
Proper installation of roofing edge flashing follows a specific sequence that ensures water is always directed on top of the flashing and toward the gutter system. Doing this out of order is one of the most common mistakes made during DIY or low-quality roofing work, and it can completely defeat the purpose of having the flashing installed at all.
Step-by-Step Installation Process
The first step is preparing the roof deck by ensuring the edge is clean, even, and free of old nails, caulk, or deteriorated wood. If the fascia board shows any signs of rot, it must be replaced before the new flashing goes on. Installing roofing edge flashing over damaged wood simply delays the inevitable and makes future repairs more difficult.
At the eaves (the lower horizontal edges of the roof), the flashing is installed directly over the bare deck and the underlayment is then rolled out on top of it. This sequence ensures that any water that gets under the underlayment will land on top of the flashing and be directed outward. Pieces of roofing edge flashing are overlapped by at least two inches at joints to prevent any gaps, and each piece is fastened with roofing nails spaced approximately every twelve inches.
At the rakes (the sloped sides of the roof), the process reverses. The underlayment goes down first, and the roofing edge flashing is installed on top of it. This ensures that rain running down the slope cannot get behind the flashing and under the underlayment. The shingles are then installed over the top of everything, with the first course overhanging the flashing slightly to direct water over the drip edge rather than against the fascia.
The final step involves checking all overlaps and fasteners to confirm nothing has shifted during installation and that the entire perimeter has continuous, uninterrupted coverage with no gaps or lifted sections. A professional installation of roofing edge flashing also includes a final inspection after the shingles are down to ensure the system performs as a cohesive whole.
Things To Know About Roofing Edge Flashing
Before committing to a material, profile, or contractor, there are several practical details that every homeowner should understand about roofing edge flashing that do not always come up in general conversations about roofing.
- Roofing edge flashing should always be replaced when you replace your shingles. Reusing old flashing under new shingles is a common cost-cutting shortcut that frequently leads to early leaks because the old metal may already be corroded, bent, or improperly sized for the new roofing system.
- In Winnipeg, ice and water shield membrane is often installed along the eaves beneath the flashing as an additional layer of protection against ice dams. This membrane is self-adhesive and seals around nails, providing a secondary waterproof barrier if water does back up under the shingles during freeze-thaw cycles.
- The minimum recommended overhang for roofing edge flashing is three-quarters of an inch beyond the fascia, but many contractors extend this to one inch for better protection in high-rainfall areas.
- Roofing edge flashing that has turned white or chalky is a sign of oxidation and should be evaluated. While oxidized aluminum is still technically functional, it can indicate that the protective coating has been compromised and the flashing is nearing the end of its useful life.
- Improper nail placement during flashing installation is one of the leading causes of early leaks. Nails should never be placed through the flat portion of the flashing that sits on the deck because those holes can allow water infiltration. Fasteners should go through the vertical face of the flashing only.
- For commercial flat roofing applications, roofing edge flashing is a critical component of the termination bar system that seals the membrane to the parapet wall. Learn more about how this works in a commercial context by reading about commercial roofing repairs.
Why Winnipeg Homeowners Trust Zega Roofing for Roofing Edge Flashing
Zega Roofing is a trusted local roofing company with over 25 years of experience serving residential and commercial property owners across Winnipeg and the surrounding communities. With a deep understanding of Manitoba’s unique climate challenges, the Zega Roofing team installs roofing edge flashing using materials and profiles specifically selected for cold-weather performance.
Every project is handled by certified, licensed, and fully insured roofers who prioritize proper technique over speed, because doing it right the first time is always less expensive than coming back to fix a leak. Whether you are dealing with a full replacement or suspect that aging roofing edge flashing is causing water infiltration, contact Zega Roofing at +1 204-997-2697 for a free inspection and honest estimate.
Frequently Asked Questions About Roofing Edge Flashing
What is roof edge flashing called?
Roof edge flashing is most commonly called a drip edge. The term refers to the specific function it performs: creating a drip point that pulls water away from the fascia and directs it into the gutter. You may also hear it referred to as eave flashing, rake flashing, or starter flashing depending on where on the roof it is being installed and which profile is being used.
What is the best purpose for flashing on the edge of a roof?
The primary purpose of roofing edge flashing is to prevent water from wicking back under the shingles and into the roof deck. It also holds the first course of shingles securely in place, protects the fascia board from moisture damage, and ensures water is funneled cleanly into the gutter system rather than running down the exterior wall of the house. In cold climates, it plays a secondary role in managing the effects of ice dams by giving meltwater a defined path off the roof.
What is the purpose of roof edging?
Roof edging protects the perimeter of the roof structure from water infiltration, wind uplift, and physical deterioration. Without a properly installed roofing edge flashing system, the most exposed section of any roof would have no continuous barrier against the elements. Roof edging also provides a clean, finished appearance to the roofline and helps maintain the structural integrity of the sheathing and fascia over the long term by keeping moisture out of the wood components at the roof’s edge.
What material is used for roof edges?
The most common materials used for roofing edge flashing in Canada are galvanized steel, aluminum, and copper. Galvanized steel is the standard choice for most residential installations due to its strength and affordability. Aluminum is widely used where a lightweight, rust-resistant option is needed, particularly on wood-framed homes. Copper is the premium choice and is selected for its exceptional longevity and aesthetic value on higher-end properties.
What is roof edging called?
Roof edging is most commonly referred to as drip edge flashing or simply drip edge. In the roofing industry, it may also be called edge metal, eave metal, or gutter apron depending on the specific profile being used and where it is being installed on the roof. All of these terms describe the same family of roofing edge flashing components that seal the perimeter of the roof structure.